clone()
클론 하면 복제가 생각나기 마련인데 이 메서드 역시 자신을 복제하여 새로운 인스턴스를 생성한다👍
clone() 메서드를 오버라이딩 하려면 Cloneable을 구현해야한다.Cloneable인터페이스를 구현하지 않고 clone()을 호출하면 예외가 발생한다.
class TestCalss implements Cloneable {
    ...
    public Object clone() {
        try {
            Object obj = super.clone();    // clone()은 반드시 예외처리를 해주어야한다.
        } catch(CloneNotSupportedException) {}
        return obj;
    }
}Cloneable인터페이스가 구현되어 있다는 것은 클래스 작성자가 복제를 허용한다는 의미이다.
다음은 clone() 메서드의 오버라이딩, 사용 예제이다.
class Point implements Cloneable{
    int x, y;

    Point(int x, int y){
        this.x = x;
        this.y = y;

    }

    @Override
    public String toString() {
        return "x : " + x + ", y : " + y;
    }

    @Override
    public Object clone() {
        Object obj = null;
        try {
            obj = super.clone();
        } catch (CloneNotSupportedException e) {}
        return obj;
    }
}

public class CloneTest {
    public static void main(String[] args) {
        Point original = new Point(3, 5);
        Point copy = (Point)original.clone();
        System.out.println(original);
        System.out.println(copy);
    }
}
/* 결과
x : 3, y : 5
x : 3, y : 5
*/공변 반환 타입
위의 예제에서는 오버라이딩된 clone() 메서드의 리턴이 Object로 리턴이 되기 때문에
이 메서드를 사용할 때마다 형변환을 시켜야 하지만 clone()메소드 자체의 return에서
형변환을 할 수 있다.
    @Override
    public Point clone() {    // return 타입을 Object → Point 변경
        Object obj = null;
        try {
            obj = super.clone();
        } catch (CloneNotSupportedException e) {}
        return (Point)obj;  // Point 타입으로 형변환
    }
이렇게 공변 반환타입을 사용하면 번거로운 형변환이 줄어든다.Point copy = (Point)original.clone(); → Point copy = original.clone()
얕은 복사와 깊은 복사
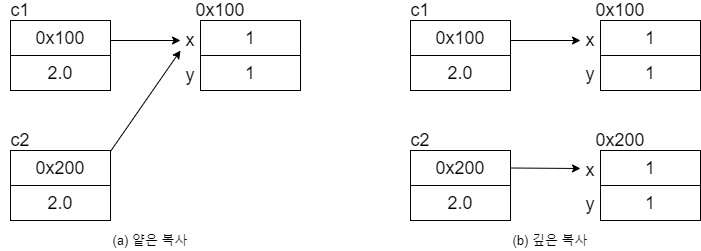
clone()으로 복제하는 경우 원본과 복제본이 같은 객체를 공유하므로 완전한 복제라고 보기 어렵다.
이러한 복제(복사)를 얕은 복사(shallow copy)라고 하며 원본을 변경하면 복사본도 영향을 받는다.깊은 복사(deep copy)는 원본이 참조하고 있는 객체까지 복제하는 것을 말하고 서로 다른 객체를
참조하기 때문에 원본의 변경이 복사본에 영향을 미치지 않는다.

class Circle implements Cloneable {
    Point p; //원점
    double r; // 반지름

    Circle(Point p, double r){
        this.p = p;
        this.r = r;
    }

    public Circle shallowCopy() {    // 얕은 복사
        Object obj = null;
        try {
            obj = super.clone();
        } catch (CloneNotSupportedException e) {}
        return (Circle)obj;
    }

    public Circle deepCopy() {    // 깊은 복사
        Object obj = null;
        try {
            obj = super.clone();
        }catch (CloneNotSupportedException e) {}
        Circle c= (Circle)obj;
        c.p = new Point(this.p.x, this.p.y);
        return c;
    }

    public String toString() {
        return "p= " + p + " / r= " +r;
    }
}

class Point{
    int x, y;

    Point(int x, int y){
        this.x = x;
        this.y = y;
    }

    @Override
    public String toString() {
        return "("+x+", "+y+")";
    }
}

public class ShallowDeepCopy {
    public static void main(String[] args) {
        Circle c1 = new Circle(new Point(1, 1), 2.0);
        Circle c2 = c1.shallowCopy(); // 얕은 복사
        Circle c3 = c1.deepCopy();      // 깊은 복사

        System.out.println("c1 : " + c1);
        System.out.println("c2 : " + c2);
        System.out.println("c3 : " + c3);

        c1.p.x = 9;
        c1.p.y = 9;
        System.out.println("c1의 변경 후");
        System.out.println("c1 : " + c1);
        System.out.println("c2 : " + c2);
        System.out.println("c3 : " + c3);
    }
}
// 결과
// c1 : p= (1, 1) / r= 2.0
// c2 : p= (1, 1) / r= 2.0
// c3 : p= (1, 1) / r= 2.0
// c1의 변경 후
// c1 : p= (9, 9) / r= 2.0
// c2 : p= (9, 9) / r= 2.0
// c3 : p= (1, 1) / r= 2.0
다음부터는 위 예제에 대한 설명이다.
참조 주소
인스턴스 c1을 생성한 후에 얕은 복사로 c2을 생성하고 깊은 복사로 c3을 생성했다.
Circle c1 = new Circle(new Point(1, 1), 2.0);
Circle c2 = c1.shallowCopy(); // 얕은 복사
Circle c3 = c1.deepCopy();    // 깊은 복사
위 상황을 그림으로 표현하였다.

그다음 c1이 가리키는 Point인스턴스의 x와 y의 값을 9로 변경한다.
c1.p.x = 9;
c1.p.y = 9;
c1 만 변경했는데 c2도 영향을 받는다, c3은 전혀 영향을 받지 않는다.

얕은 복사
shallowCopy()의 내용을 보면 단순히 Object클래스의 clone()을 호출할 뿐이다.
public Circle shallowCopy() { // 얕은 복사
    Object obj = null;
    try {
        obj = super.clone();
    } catch(CloneNotSupportedException e) {}
    return (Circle)obj;
}
Object클래스의 clone()은 원본 객체가 가지고 있는 값만 그대로 복사한다.
즉 얕은 복사를 한다.
깊은 복사
public Circle deepCopy() {
    Object obj = null;
    try {
        obj = super.clone();
    } catch(CloneNotSupportedException e) {}
    Circle c = (Circle)obj;
    c.p = new Point(this.p.x, this.p.y);
    return c;
}
deepCopy()는 shallowCopy()와 마찬가지로 일단 clone()을 이용하여 복제까지 한 후에
Circle의 멤버변수 p에게 새로운 인스턴스를 만들어 참조하게 하였다.
원본이 참조하고 있는 객체까지 복사한 것이다.


댓글